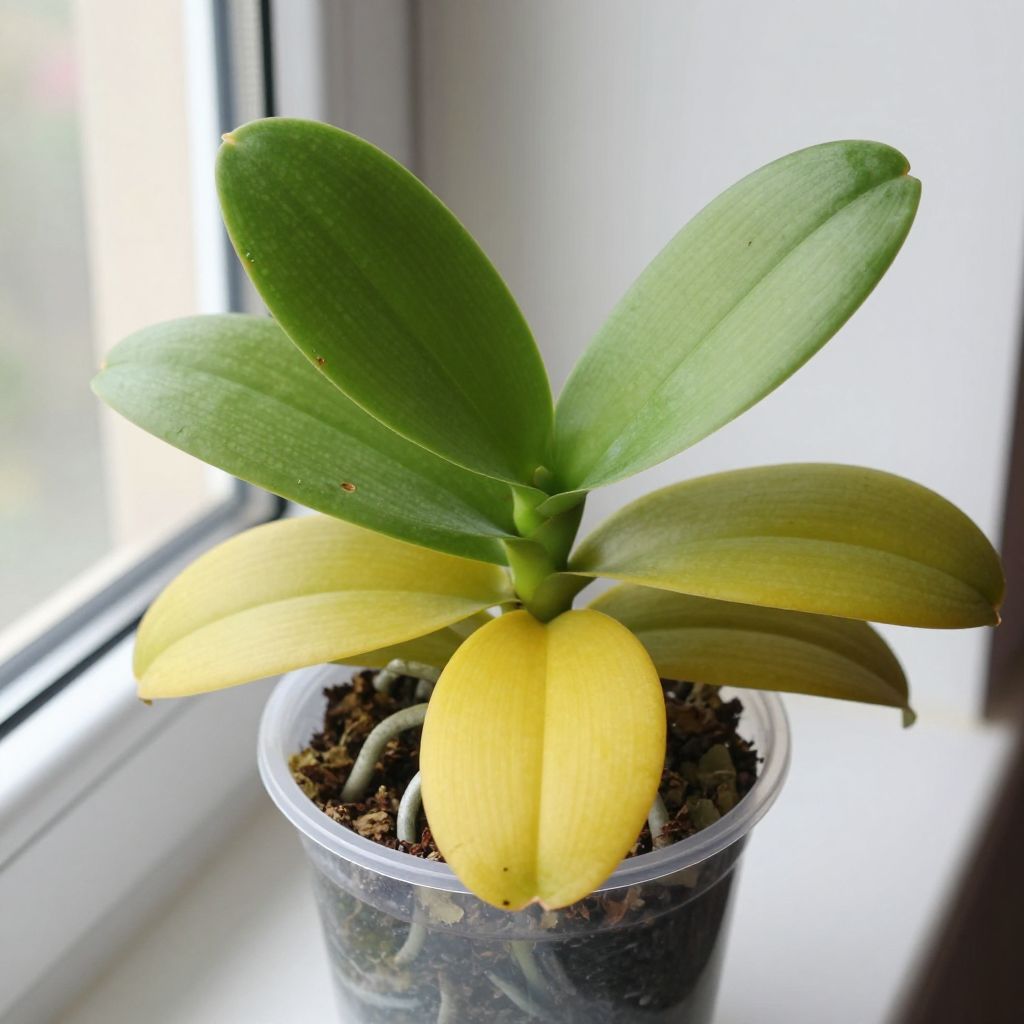
Why are my orchid leaves turning yellow? In many cases, yellowing leaves are a sign that the plant is stressed by watering, light, roots, or age rather than a single disease. The key is to look at which leaves are yellowing, how fast it’s happening, and what the roots and potting mix look like.
Orchids can be forgiving once you match their care to their growing conditions. A small amount of yellowing on the oldest leaf can be normal, but widespread yellowing usually means something needs to change.
Why are my orchid leaves turning yellow?
Orchid leaves turn yellow most often because of overwatering, root damage, too much direct sun, low light, nutrient imbalance, or natural aging of older leaves. Check the roots, potting mix, and light first. The pattern of yellowing tells you whether the plant needs less water, better drainage, or a different spot.
Start by reading the pattern of yellowing
Before you change anything, look closely at the plant. The location of the yellowing leaf often points to the cause.
- One lower leaf turning yellow: often normal aging, especially if the plant is otherwise healthy.
- Several leaves yellowing from the base: often a watering or root problem.
- Leaves yellowing with brown, sunburned patches: usually too much direct light.
- Yellowing with limp, wrinkled leaves: roots may be failing, so the plant cannot take up water properly.
- Yellowing plus black or mushy tissue: possible rot or disease.
If only the oldest leaf is fading and the rest of the plant looks firm and green, you may not need to do anything. Orchids naturally shed older leaves over time.
Common causes of yellow orchid leaves and how to fix them
1. Overwatering and root rot
This is one of the most common reasons orchid leaves turn yellow. Orchids need air around their roots, and soggy potting mix can suffocate them. Roots then turn brown, mushy, or hollow, and the leaves begin to yellow.
What to do:
- Remove the orchid from its pot and inspect the roots.
- Trim away dead roots with clean, sterilized scissors.
- Repot in fresh orchid bark or another airy orchid mix.
- Use a pot with drainage holes, and never let it sit in standing water.
Water only when the mix is approaching dryness, not on a fixed calendar. In many homes, that means less often in winter and more often during active growth or warm, bright weather.
2. Underwatering
Too little water can also cause yellowing, especially if the leaves look thin, wrinkled, or leathery. The plant may be drying out faster than you expect because of warm indoor air, small pots, or coarse bark mix.
What to do:
- Check the potting mix with your finger or a wooden skewer.
- If it is dry deep in the pot, water thoroughly until excess drains out.
- Make sure the roots are absorbing water, not just getting a quick splash.
For most orchids grown indoors, a thorough watering followed by complete drainage is better than frequent light sprinkling.
3. Too much direct sunlight
Orchid leaves can yellow or bleach when exposed to harsh sun, especially through a hot window. Sunburn often shows up as pale yellow areas that may later turn tan or brown and feel dry.
What to do:
- Move the orchid to bright, indirect light.
- Use a sheer curtain if the window gets strong midday or afternoon sun.
- Rotate the plant occasionally so light is even on all sides.
Many common house orchids, such as Phalaenopsis, do best in bright but filtered light rather than direct sun.
4. Too little light
Low light can also cause leaves to yellow, especially if the plant is struggling to photosynthesize. In dim conditions, orchids may grow slowly, produce weak leaves, and fail to rebloom.
What to do:
- Move the orchid closer to a bright window with indirect light.
- Choose an east-facing window or a lightly shaded south- or west-facing window, depending on your climate and season.
- If natural light is limited, consider a grow light placed at an appropriate distance for the plant.
Light needs vary by orchid type, so adjust gradually and watch for leaf color. Healthy leaves are usually medium green, not dark green and not pale yellow-green.
5. Natural aging of older leaves
Sometimes the answer is simply age. Orchids naturally drop their oldest leaves one at a time as new growth develops. This is common on many orchids, especially when the plant is otherwise healthy and actively producing new roots or leaves.
What to look for:
- The yellowing leaf is the lowest, oldest one.
- The rest of the plant looks firm and healthy.
- New leaves or roots are forming.
Do not remove a leaf just because it is yellowing. Let it detach naturally unless it is soft, rotten, or diseased.
6. Fertilizer problems
Orchids need nutrients, but too much fertilizer can damage roots and contribute to yellowing leaves. Salt buildup in the mix can also stress the plant. On the other hand, a long period without nutrients may leave the plant weak and pale.
What to do:
- Flush the potting mix occasionally with plain water to reduce salt buildup.
- Use a fertilizer labeled for orchids or a balanced houseplant fertilizer diluted according to the label.
- Avoid fertilizing a stressed plant with damaged roots until it begins recovering.
If you are unsure, err on the side of less fertilizer rather than more. Overfeeding is harder to fix than mild underfeeding.
7. Cold stress or sudden temperature swings
Chilling drafts, cold windowsills, or sudden shifts from warm to cold can yellow orchid leaves. Orchids are sensitive to temperature extremes, especially near doors, vents, or drafty glass.
What to do:
- Move the plant away from cold drafts and heating vents.
- Keep it off freezing windowsills in winter.
- Avoid placing it near appliances or areas with abrupt temperature changes.
If the yellowing started after a cold snap, check for soft, watery tissue as well. Cold damage can lead to rot later.
8. Pests and disease
Scale, mealybugs, and fungal or bacterial problems can weaken orchid leaves and cause yellowing. Look for sticky residue, cottony clusters, raised bumps, dark spots, or spreading soft areas.
What to do:
- Isolate the orchid from other plants.
- Inspect the undersides of leaves and the crown.
- Remove pests by hand or with a gentle treatment suitable for orchids.
- Cut away diseased tissue only if you can do so cleanly and safely with sterilized tools.
Good air circulation and clean tools help prevent problems from spreading. Always disinfect pruners between plants.
How to troubleshoot yellow orchid leaves step by step
If you are not sure what is wrong, work through a simple check. This is the fastest way to narrow down the cause.
- Check the roots. Healthy roots are usually firm and green or silver-gray, depending on moisture. Brown, mushy, or hollow roots point to rot or dehydration.
- Feel the potting mix. If it stays wet for too long, drainage may be poor. If it dries out rapidly, the plant may need more frequent watering or a different mix.
- Inspect the light. Look for scorch marks or a very dark, weak plant. Adjust gradually rather than moving it from deep shade to hot sun.
- Look at the yellowing pattern. One old leaf is different from many leaves yellowing at once.
- Check for pests or spots. Sticky residue, bumps, or spreading lesions need immediate attention.
What to do with yellow orchid leaves
Do not rush to cut off a yellow leaf unless it is already dead, mushy, or diseased. A leaf that is still partly green can continue feeding the plant while it finishes aging.
If a leaf comes off easily, that is fine. If it resists, leave it alone. Pulling can tear healthy tissue and create an entry point for disease.
When pruning makes sense
- Remove leaves that are fully dead and detached easily.
- Cut away rotten tissue with sterilized scissors or a blade.
- Discard diseased material rather than composting it if you suspect infection.
Repotting can solve recurring yellowing
If yellow leaves keep appearing and the roots are declining, repotting may be the best fix. Orchids grown in broken-down bark, moss that stays too wet, or compacted mix often struggle until they are moved into fresh media.
Choose a pot with plenty of drainage and an orchid mix that matches your watering habits and home conditions. A coarse bark mix dries faster, while sphagnum moss holds more moisture and can be useful in dry environments if you are careful not to overwater.
Repot after flowering if possible, unless the plant is in urgent decline. Handle roots gently and avoid burying the crown.
Indoor vs. outdoor orchids
Most yellow-leaf problems show up in indoor orchids, but outdoor orchids can yellow from sun, rain, wind, or cold snaps just as easily. Outdoor plants often need more careful placement under shade, protection from heavy rain, and shelter from temperature extremes.
If your orchid lives outdoors part of the year, move it gradually when changing locations. Sudden shifts from bright shade to full sun can cause leaf damage quickly.
How to prevent yellow orchid leaves
Prevention is mostly about consistency and observation. Orchids do best when their roots can breathe, their leaves get bright indirect light, and their potting mix matches the plant’s moisture needs.
- Use a pot with drainage holes.
- Water based on root color, pot weight, and mix dryness, not a rigid schedule.
- Provide bright, indirect light.
- Keep the plant in a stable temperature range away from drafts.
- Fertilize lightly and flush salts occasionally.
- Repot when the mix breaks down or roots outgrow the pot.
The biggest mistake is treating all yellowing the same. A single aging leaf needs very different care from a plant with rotten roots or sunburn.
Conclusion: what you should do next
If you are asking, “Why are my orchid leaves turning yellow,” start with the roots, light, and watering habits. Those three factors explain most cases. Make one change at a time, then watch the plant for new growth and firmer leaves over the next few weeks.
If you want to improve your orchid care further, it also helps to read more about orchid repotting and root care and how to water houseplants correctly for your home’s light and humidity conditions.
Leave a Reply