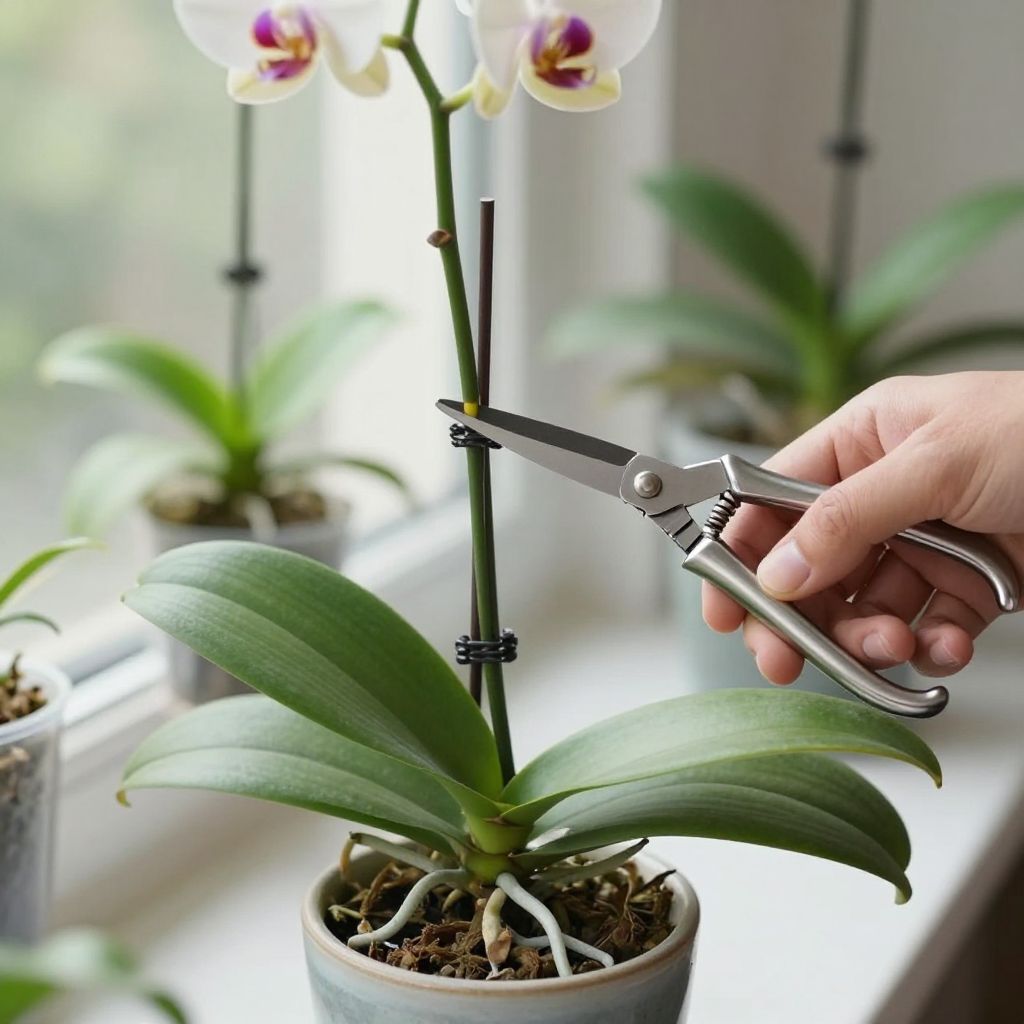
Wondering where to cut orchid stem after the flowers fade? The right cut depends on the type of orchid and the condition of the flower spike. In many cases, you can encourage a second bloom from a healthy green stem; in others, it’s better to remove the spike completely so the plant can rest and rebuild energy.
With a few simple checks, you can prune your orchid confidently without harming future blooms. The key is to look at the stem color, the orchid type, and whether the spike is still alive or drying out.
Where to cut orchid stem?
Cut a healthy green orchid flower spike just above a node, usually the second or third node from the base, if the orchid type commonly reblooms from old spikes. If the stem is brown, dry, or hollow, cut it off near the base with clean, sterilized tools. Never cut into the crown or leaves.
First: identify what kind of orchid you have
Not all orchids should be cut the same way. The most common houseplant orchid, Phalaenopsis (moth orchid), often reblooms from a green flower spike, while many other orchids are better off having the spent stem removed after flowering.
Common orchid stem types
- Green, firm spike: Still alive and may produce a side branch or new blooms.
- Brown or tan spike: Dead tissue; it will not bloom again.
- Yellowing spike: Dying back; usually best to remove it.
- Spongy or hollow stem: Often spent and ready for full removal.
If you are not sure which orchid you have, start by treating it like a moth orchid only if the plant has broad, fleshy leaves and a single arching flower spike. When in doubt, observe the spike for a week or two; a living green stem stays firm, while a dying one gradually shrivels.
How to cut a green orchid stem for reblooming
If the spike is still green after the flowers drop, you can often cut it just above a node to encourage a side shoot. This is most commonly done on Phalaenopsis orchids, and it works best when the plant is healthy, well-rooted, and not under stress.
- Find the nodes on the flower spike. These are small bumps or joints along the stem.
- Count up from the base of the spike and choose the second or third node.
- Use clean, sharp pruners or scissors.
- Cut about 1/4 inch above the node at a slight angle.
- Remove only the spent flower portion, not the whole green stem.
Why above a node? Nodes contain dormant buds that can sometimes grow into a side branch with new flowers. Cutting too far above the node leaves a long stub that can dry out and look untidy; cutting too close may damage the bud.
When to choose the second node vs. the third node
- Second node: Often used when the plant is strong and you want a better chance of a quicker side spike.
- Third node: A slightly safer choice if the lower part of the spike looks weak or if you want to leave more stem supporting the plant.
There is no perfect rule for every orchid. If the stem is still vigorous and the plant has good roots and leaves, either cut can work. If the orchid is small, recently repotted, or recovering from stress, it may be better to remove less and let the plant rest.
When to cut the orchid stem all the way down
Cut the stem off near the base when the spike has turned brown, dried out, or become yellow. In these cases, the orchid is no longer using that stem, and leaving it in place can invite rot or simply drain the plant’s energy visually and physically.
Cut the spike to the base if:
- The stem is completely brown and brittle.
- The spike has turned yellow from top to bottom.
- It feels hollow, dry, or papery.
- The orchid has already rebloomed once and is now exhausted.
- You want the plant to focus on roots and leaves instead of a second bloom.
Make the cut about 1/2 inch above the base of the spike, where it emerges from the plant. Avoid cutting into the crown, the central growing point between the leaves. Damage there can seriously set the plant back.
Tools and technique: make a clean cut
Orchid stems are easy to damage if you use dull or dirty tools. A clean cut heals better and lowers the risk of disease entering the plant through the wound.
What to use
- Sharp scissors, floral snips, or pruning shears
- Rubbing alcohol or a disinfectant wipe for sterilizing blades
- Optional: cinnamon for dusting a fresh cut on a dry, healthy stem end, used sparingly
Before cutting, wipe the blades with alcohol. After cutting a diseased-looking or mushy stem, sterilize again before moving to another plant. This simple habit helps prevent spreading bacteria or fungus between orchids.
How to cut safely
- Support the spike with one hand if needed.
- Make one smooth cut rather than sawing back and forth.
- Keep the cut slightly angled so water does not sit on the wound.
- Do not trim leaves, roots, or the crown unless they are clearly damaged and you know what you are removing.
What happens after you cut the stem?
After pruning, your orchid may either send up a side branch, pause and focus on roots, or gradually enter a rest period. All three outcomes can be normal. The plant’s response depends on its overall health, light, temperature, and how much energy it has left after flowering.
Signs your orchid is recovering well
- Leaves stay firm and green.
- New roots begin to appear at the pot edge or above the mix.
- The cut end dries cleanly without turning mushy.
- A new side shoot emerges from a node on a green spike.
If the plant looks tired after flowering, do not rush it into more blooming. A healthy orchid often benefits more from steady care than from forcing a quick rebloom.
Growing tips that help orchids bloom again
Pruning is only one part of orchid care. To get a good rebloom, the plant needs the right light, watering, and airflow. Orchids grown indoors do best when their basic needs are consistent and matched to the season.
Light
Most moth orchids prefer bright, indirect light. A spot near an east window is often ideal, while a south or west window may need a sheer curtain to prevent leaf scorch. Leaves should usually be medium green, not very dark and not yellowish.
Watering
Water when the potting mix is approaching dryness, not on a fixed calendar. Orchid roots need moisture, but they also need air. Let excess water drain fully, and never leave the pot sitting in water.
Potting mix and drainage
Use an orchid mix that drains quickly, such as bark-based media designed for epiphytic orchids. Regular potting soil stays too wet and can suffocate roots. A pot with drainage holes is essential.
Humidity and airflow
Moderate humidity and gentle air movement help orchids stay healthy. Stagnant, damp air can encourage rot, especially around fresh cuts and old flower spikes.
Common mistakes to avoid
Most orchid pruning problems come from cutting too much, cutting in the wrong place, or pruning a plant that is already stressed. A careful, conservative approach is usually best.
- Do not cut green roots. Aerial roots are normal and important.
- Do not cut into the crown. The crown is vital to the plant’s growth.
- Do not leave brown, dead spikes on the plant for too long. They can become unsightly and may rot.
- Do not use dirty tools. This increases disease risk.
- Do not expect every orchid to rebloom from the old stem. Some types bloom on new spikes only.
Troubleshooting: what if the stem looks strange?
Sometimes the spike does not look clearly green or brown. A little observation helps you decide whether to cut, wait, or remove the stem entirely.
If the stem is yellowing from the top down
Trim off the yellow section first if the lower part remains green, then watch the rest. If yellowing continues, remove the spike near the base.
If the stem is soft or mushy
Cut it back to firm tissue immediately. Softness can indicate rot, especially if the plant has been kept too wet or water has collected in the crown.
If the orchid is weak after blooming
Remove the whole spike so the plant can recover. A tired orchid often benefits more from rest, root growth, and stable care than from trying to rebloom right away.
If a new side shoot appears
Leave it alone and support the plant with good light and proper watering. Avoid moving the pot around too much, since orchids often respond best to stable conditions.
Should you cut orchid stems on all orchids?
No. The best cut depends on the orchid’s growth habit. Phalaenopsis orchids are the main type where cutting above a node is commonly useful. Other orchids, such as many Dendrobium or Cattleya types, may flower from different growths or should have spent spikes removed after blooming.
If you are unsure, check the plant label or identify the orchid before pruning. When identification is unclear, a conservative cut of only the dead portion is usually safer than an aggressive trim.
Conclusion: the safest rule for cutting orchid stems
Start by checking whether the stem is green or brown. Cut a healthy green spike just above a node if you want to try for reblooming, and cut a dead spike near the base if it has dried out. With clean tools and a careful hand, you can prune confidently and help your orchid stay healthy.
For more orchid care help, you may also want to read about orchid growing basics and moth orchid care tips.