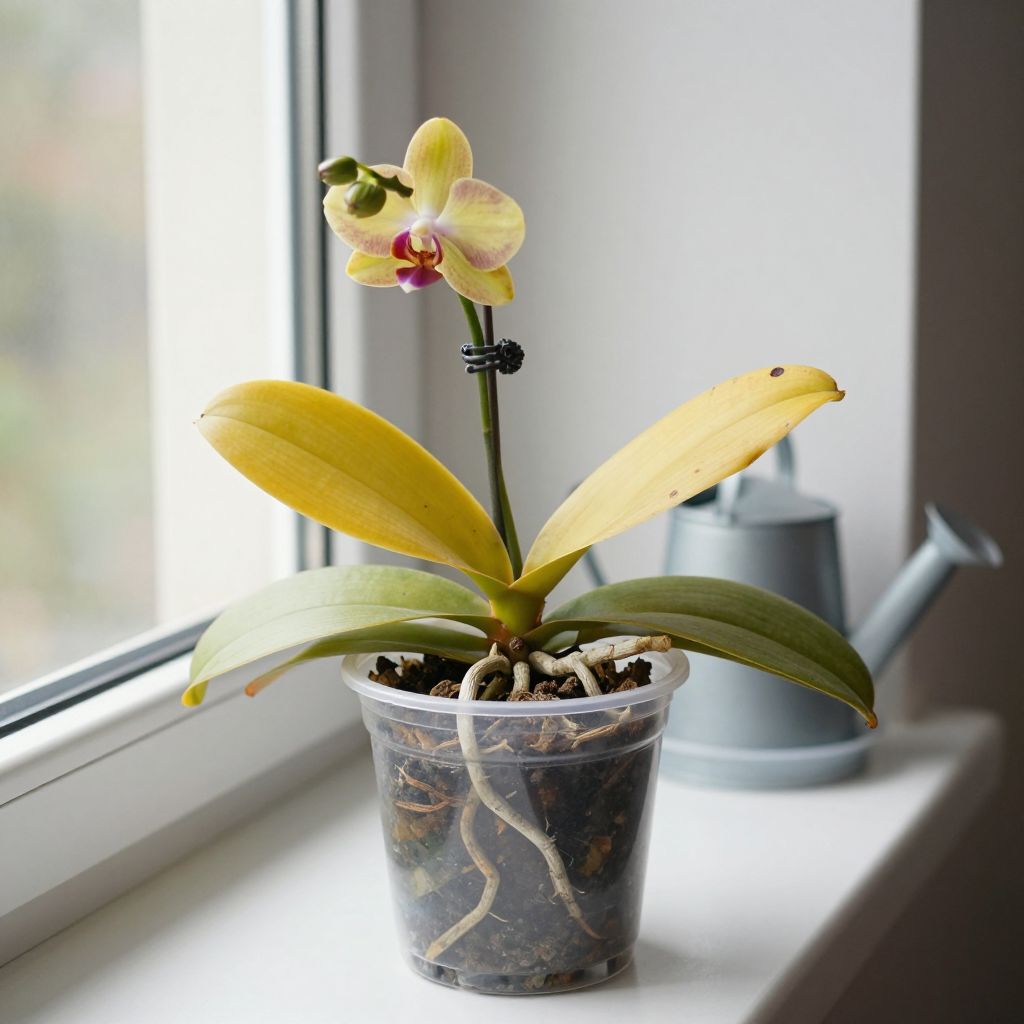
Why is my orchid dying? In many cases, the plant is not truly dying at all—it is reacting to a care problem such as too much water, too little light, poor drainage, root rot, or stress after blooming. Orchids are sensitive, but they are also resilient when you correct the cause early.
The key is to look at the roots, leaves, potting mix, and growing conditions together. Once you identify what the plant is telling you, you can usually stop the decline and help it recover.
Why is my orchid dying?
Most orchids decline because their roots are damaged by excess moisture, stale potting mix, or poor light. Yellowing leaves, mushy roots, shriveled pseudobulbs, or flower drop are usually symptoms of an environment that does not match the plant’s needs. Fix the root cause first, then trim damaged growth.
Start with the roots: the most important check
Orchid roots do most of the work of water and nutrient uptake, so root health tells you a lot. If the roots are firm and plump, the plant may still recover even if the leaves look rough.
Healthy vs. unhealthy roots
- Healthy roots are firm, often green when wet and silvery-gray when dry.
- Rotten roots are brown or black, soft, hollow, or slimy.
- Dried-out roots may look papery, brittle, and shriveled.
If the potting mix smells sour or stays wet for many days, suspect root rot. Orchids need air around the roots, not dense, soggy soil.
What to do if roots are failing
- Remove the orchid from its pot.
- Gently shake off old mix and rinse the roots if needed.
- Use sterile scissors to cut away mushy, black, or hollow roots.
- Repot into fresh orchid bark or another suitable airy mix.
- Choose a pot with drainage holes and, ideally, side ventilation.
Do not repot into regular potting soil. Most common house orchids, especially Phalaenopsis, need a coarse orchid mix that drains quickly and allows airflow.
Common reasons orchids decline and how to fix them
1. Overwatering
Overwatering is the most common reason orchids fail. Even if you water only once a week, the plant can still suffer if the mix stays wet too long or the pot has poor drainage.
Signs include yellow leaves, mushy roots, and a pot that feels heavy for days after watering. Let the mix approach dryness between waterings, but do not let the plant sit bone-dry for long periods if it is actively growing.
To water correctly, soak the mix thoroughly, then let all excess water drain away. Empty decorative cachepots and saucers so the roots are never standing in water.
2. Underwatering
Underwatering can also make an orchid look like it is dying. Leaves may become limp or wrinkled, roots may shrivel, and flower buds may dry up and drop before opening.
This often happens when the plant is in a very dry room, in a small pot, or in bark that has become old and water-repellent. If the mix dries too fast, water more often or repot into fresh medium.
3. Poor light
Orchids need enough light to grow and bloom, but direct hot sun can scorch the leaves. Too little light often leads to weak growth, no flowers, and gradual decline.
For many common indoor orchids, bright indirect light near an east window or a filtered south or west window works well. Leaves should usually be medium green, not dark green and not yellowed from sunburn.
If the plant is stretching or refusing to rebloom, move it to a brighter spot gradually over several days to avoid shock.
4. Wrong temperature or humidity
Orchids are sensitive to sudden changes. Cold drafts, heat vents, and very dry indoor air can stress the plant and cause buds to drop or leaves to wrinkle.
Most common house orchids prefer moderate indoor temperatures and some humidity. If your home is very dry, a humidity tray, grouped plants, or a room humidifier can help. Keep the plant away from radiators, fireplaces, and air-conditioning blasts.
5. Old or broken-down potting mix
Orchid bark breaks down over time, becoming finer and holding too much water. When that happens, roots lose airflow and rot more easily.
If the mix is dark, compacted, or smells sour, repot. Many orchids benefit from repotting every 1 to 2 years, depending on the medium and how fast it decomposes in your conditions.
6. Fertilizer problems
Too much fertilizer can burn roots and leaf tips, while too little may leave the plant weak over time. A white crust on the pot or mix can indicate salt buildup.
Flush the pot with plain water occasionally to wash out excess salts, especially if you fertilize regularly. If you suspect fertilizer burn, stop feeding for a few weeks and repot if the roots are damaged.
7. Pests
Mealybugs, scale, spider mites, and aphids can weaken orchids by feeding on sap. They often hide in leaf joints, under leaves, or around the crown.
Check the plant closely if you see sticky residue, tiny webs, cottony clusters, or distorted new growth. Isolate the orchid from other houseplants while you treat it.
- Wipe visible pests off with a cotton swab dipped in rubbing alcohol.
- Rinse leaves gently with water.
- Repeat inspections weekly until the infestation is gone.
8. Disease and crown rot
Soft, dark, rapidly spreading tissue at the crown or base of the leaves may indicate rot. This often follows water trapped in the crown or a chronically wet growing medium.
Remove affected tissue only if it is clearly limited and you can do so cleanly with sterile tools. If the crown is badly rotted, recovery may be unlikely, but healthy side growth or keikis may still develop on some orchids.
How to tell what your orchid needs by the symptoms
Yellow leaves
One old lower leaf yellowing and dropping can be normal. Several yellow leaves, especially with soft roots, usually point to overwatering or root loss.
Wrinkled or limp leaves
This usually means the roots are not taking up enough water. Check for rot, dehydration, or a mix that repels water.
Flower buds falling off
Bud blast is often caused by temperature swings, low humidity, drafts, or moving the plant after it has set buds. Stable conditions matter more than extra fertilizer.
No blooms for a long time
The plant may be healthy but not getting enough light, or it may need a rest period depending on the type of orchid. Make sure it is growing strong roots and leaves before expecting flowers again.
Step-by-step rescue plan for a struggling orchid
- Inspect the roots. Remove the plant from the pot and assess root health.
- Trim damaged roots. Use clean, sharp scissors and remove only dead tissue.
- Repot if needed. Use fresh orchid mix and a pot with drainage holes.
- Adjust watering. Water only when the mix is nearly dry but not dusty dry for long.
- Improve light. Move the orchid to bright, indirect light.
- Stabilize the environment. Avoid drafts, hot sun, and sudden temperature changes.
- Pause heavy feeding. Fertilize lightly only after new roots or leaves appear.
After repotting, do not overwater to “help it recover.” Freshly trimmed roots are especially vulnerable to rot. Water lightly at first, then resume normal care once you see signs of new growth.
Special notes for indoor orchids
Most home growers keep orchids indoors, where the biggest issues are low light, dry air, and watering too often. A bathroom or kitchen may offer more humidity, but only if the light is still bright enough.
Rotate the pot occasionally so growth stays balanced, but avoid moving it around constantly. Orchids dislike frequent changes once they have settled in.
Special notes for outdoor orchids
If you grow orchids outdoors in a suitable climate, weather becomes the main challenge. Heavy rain, cold snaps, hot sun, and wind can all stress the plant.
Use a sheltered position with bright filtered light and excellent airflow. In rainy periods, make sure pots drain quickly and do not stay waterlogged. Bring tender orchids under cover if temperatures drop below what the plant can tolerate.
Common mistakes that make orchids look worse
- Leaving the plant in a decorative pot without drainage.
- Using regular garden soil or dense compost.
- Watering on a fixed schedule instead of checking the mix.
- Letting water sit in the crown.
- Keeping the orchid in a dark room.
- Repotting into a container that is far too large.
- Fertilizing a stressed plant too heavily.
A pot that is too large can hold excess moisture and slow root recovery. Orchids usually do better in a snug pot that matches the root system.
When an orchid is beyond saving
If all roots are gone, the crown is rotten, and there is no firm tissue left, the plant may not recover. Even then, it can help to remove the dead material and learn from the conditions that caused the decline.
If any healthy roots remain, there is still hope. Orchids often recover slowly, so judge progress by new root tips, firm leaves, and fresh growth rather than by flowers alone.
Conclusion
If you are asking, “Why is my orchid dying,” start by checking the roots, then correct watering, light, and potting mix. Most orchids improve when you remove rot, refresh the medium, and give them stable, bright, indirect light. For more practical plant-care guidance, you may also find helpful reading on repotting houseplants correctly and how to diagnose yellow leaves on indoor plants.
Leave a Reply